

Looks like it’s time to get back to multi-day recipes again! Ciabatta has long been a favorite of mine — it’s tender and floury and makes a solid canvas for all sorts of dipping, topping, and filling combos. Reinhart gives several suggestions for flavoring the dough, I decided to make one plain ciabatta and one mushroom ciabatta. I like this recipe so much that I’m included an abbreviated version of Peter Reinhart’s original recipe — for more notes and variations, I absolutely recommend checking out his books!
The Process
Ciabatta dough is quite loose and wet compared to many bread doughs, and it seems to take a delicate touch to keep it from falling apart or losing its shape as it comes together. While most recipes I’ve tried thus far don’t have the bread takes shape or come out of the mixing bowl until the last stages, this one comes out almost immediately and gets squished into a rough rectangle and stretched repeatedly.
 A huge amount of flour goes into the stretching and shaping process of this floppy dough. This shouldn’t come as a surprise — even store-bought ciabatta is usually dusted with a healthy coating of flour. Some of the mushrooms are incorporated with the other ingredients, but the majority are folded into the “completed” dough during the folding process.

Baking
Ciabatta is baked on the baking stone (or a preheated cookie sheet), slid from a cutting board or pizza peel directly into the oven. From terrible past experiences, the best tip I know for doing this is to liberally coat the cutting board under the bread with semolina flour or cornmeal — otherwise your dough will not transfer smoothly into the oven, losing precious heat and probably misshaping your poor loaf.
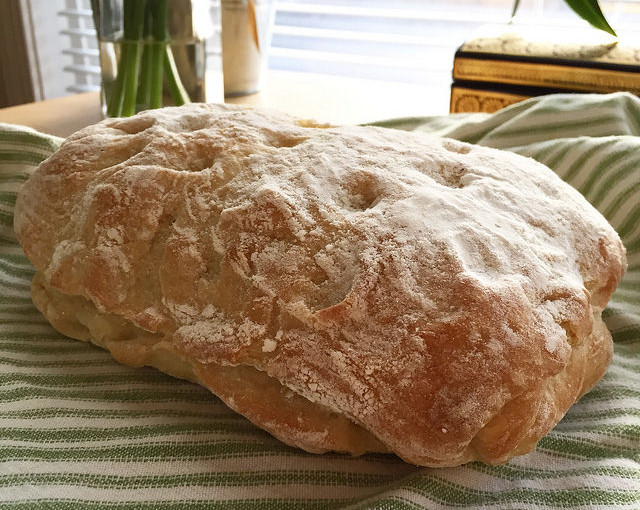
I was successful this time though, and my loaves baked up beautifully in about 15 minutes. The indentations in the plain loaf were a result of my failing to stretch the dough immediately before sliding it into the oven, and attempting to rectify the situation slightly afterwards. Oops.

Results
The bread was delicious — it was moist and tender, with a soft wheaty taste. The mushroom version was especially moist and flavorful, although I might want to play with the mushrooms types a bit in the future.
The crumb wasn’t quite right, however. A trademark of good ciabatta is the presence nice big holes in the crumb, and mine was pretty tight and uniform. The loaves turned out tasty enough that I don’t mind the texture “issue,” but I did have the chance to make the same recipe again over the weekend. This time I kept the dough much wetter, and while the sticky dough was a little more difficult to handle, the texture of the crumb was much better. All goes to show that practice does make perfect!

Peter Reinhart’s Mushroom Ciabatta Recipe
Makes two 1-pound loaves
- 3.25 cups (22.75 oz) poolish* (must prepare the day before!)
- 3 cups (13.5 oz) unbleached bread flour
- 1 3/4 tsp salt
- 1 1/5 tsp instant yeast
- 6 tablespoons water
- 1/2 cup olive oil
- 5 dried porcini mushrooms, broken into pieces
- 6 tablespoons warm water
- 1 pound fresh button or shiitake mushrooms (I used shiitake)
- 4 cloves garlic, pressed or minced
- Salt and pepper
*How to Make a Poolish: The day before you bake your bread, mix 11.25 ounces bread flour, 12 oz water and 1/4 tsp instant yeast until flour is fully hydrated. Let sit at room temperature for 3-4 hours until the mixture is nice and bubbly, then immediately refrigerate until the next day.
- Remove the poolish from the refrigerator for at least an hour to bring it to room temp. While the poolish is warming up, prep the mushrooms.
- Soak the dried mushrooms in the warm water for at least 30 minutes. Drain and set aside.
- Sautee the fresh mushrooms and garlic with 1/4 cup olive oil until soft. Strain off pan juices and add to dried mushrooms. Salt and pepper rest of the mushrooms to taste.
- Mix flour, salt and yeast together in a large bowl. Add poolish, water and 1/4 cup olive oil and mix until the ingredients form a sticky ball. Add dried mushrooms and pan juices. If you’re mixing by hand, go ahead and get your hands dirty for this one — dip you hand in a bowl of water and use it to knead the dough in the bowl, rotating the bowl with your other hand (don’t worry if this sounds confusing, it makes more sense in action). The dough should be very sticky but have a smooth consistency, and while it will stick to the bottom of the bowl, it should clear the sides of the bowl pretty well by the time it’s done.
- To prepare the dough for resting, sprinkle a cookie sheet liberally with flour to make a bed 8 inches square. Scrape the dough onto the bed of flour, then use the “stretch and fold” method, incorporating half the fresh mushrooms into the dough as you fold it.
- Stretch and Fold: Dust the dough liberally with flour, then pat into a rectangle. Wait 2 minutes for dough to relax, then pull the short ends of the rectangle outward until dough is about twice as long. Fold the dough into thirds, then press back into a rectangle. Mist with spray oil and dust with flour.
- Cover the dough and let rest (it may puff up, but probably won’t rise very much) for 30 minutes, then repeat stretch and fold movement again, incorporating the rest of the fresh mushrooms into the dough. Cover and let ferment for 1 1/2-2 hours.
- Set up a couche (clean, floured kitchen towel) for two loaves. Carefully divide the dough into two equal pieces and use the stretch and fold method to give the dough its final shape (a rough rectangle). Mist the dough with spray oil and dust with flour, then cover with a towel and let rise for 45-60 minutes. The dough should swell noticeably.
- While the dough is rising, preheat the oven to 500F, making sure to place an empty metal or cast iron pan on the lowest rack. If you’re using a pizza stone like I did, make sure to stick that in the oven during preheating too!
- When the oven and the dough are ready, carefully lift the loaves one at a time onto a pizza peel or wooden cutting board that has been very liberally dusted in semolina flour or cornmeal. As you set them down, stretch them to be 9-12 inches long. They might spring back a bit, but that’s okay.
- Pour a cup of hot water into the steam pan right before you close the oven. It will, as the name suggests, immediately steam up the oven. Now for the fussy part: wait 30 seconds, then open the oven and spritz or sprinkle a bit of water on the sides of the oven. Do this two more times, then close the oven and turn the temperature down to 450F.
- Back for 15-20 minutes, until light golden (They will register 205F inside). The loaves will be hard at first, but will soften once they cool down. Cool for at least 45 minutes before slicing and eating!