Year of Bread: The First Loaf

bbaAs one of my food resolutions for 2015, I’ve decided to bake my way through Peter Reinhart’s The Bread Baker’s Apprentice, of which I received two copies for Christmas. The book really provides everything you’d want in a guide for making better bread, and with a little over 40 recipes it’ll make a feasible weekly challenge for this year. The introduction alone — a few chapters on the science and techniques behind good breadmaking — clocked in at over a hundred pages of info-heavy text. I can already tell that Reinhart is going to keep me on my toes from week to week.

For my first baking project, I decided to skip ahead to the French bread recipe. I had a couple reasons for choosing this as my maiden loaf. First of all, I wanted to take advantage of the bread/pizza stone that I also got for Christmas :). Secondly, I wanted to start with a recipe with which I was already somewhat familiar. I’ve made simple French baguettes before, so the process, ingredients, and “feel” of the dough aren’t entirely new to me. Since I was using new tools and some new techniques, I wanted to be able to focus on those new aspects of my baking setup rather than struggling with a new recipe. Here’s what I’ve learned from my first Reinhart baguette.

Making Bread is a Sciencepate

For producing a relatively simple food item, the breadmaking process is pretty fussy. There are a lot of factors that come into play, some which a baker has control over, and many which they do not. Learning to recognize the signs of a properly developing dough are helpful to keeping yourself on track– things like knowing whether it’s too wet or dry during the initial mixing and adjusting accordingly, or using in the windowpane test as a sign of proper gluten formation.

Making Bread is Slow

proofing baguetteReinhart is a big advocate of the slow fermentation process that is getting a lot of love these days in the bread world. I’m not expert enough to say that it does or doesn’t provide a higher quality loaf in the end, but one thing it definitely does is increase the amount of time it takes to go from mixing bowl to table.

I started my pre-ferment on Tuesday evening, let it hang out in the fridge overnight after an initial rise, then spend another four hours on Wednesday afternoon mixing, kneading, rising and shaping the dough before it ever even got close to the oven. Baking a good loaf of bread takes some forethought and planning, which isn’t a bad thing, but it’s probably not in-line with the way most people cook these days.

Making Good Bread is Difficultfinalbaguette

The funny thing about learning new skills is that the more you learn, the more you realize you don’t know shit. I thought I had a relatively good handle on baking, at least at the “advanced beginner” level. Now I’m not so sure. I totally skimped on the windowpane test, which is something I need to learn to be more patient about. I also need to be more aggressive about my scores – mine were a last-minute addition that pretty much just melted back into the bread unhelpfully.

Reinhart also suggests a much more complex oven set up than I’ve had previously: a pan of hot water and periodic spritzing of the oven sides to create a steamy environment for superior crust formation. Of course cranking up my oven to 500°F during preheating had the fun bonus effect of causing my extremely sensitive smoke detector to freak out, repeatedly. This was also the first time I’d used the peel method of getting the bread from rising spot to oven — usually I do the final rise directly in a bread pan or sheet, and just stick the whole thing in the oven. The process of transferring my loaf from couche to peel (read: terribly high-tech version consisting of an upside down cookie sheet dusted with semolina flour) to ultra-hot baking stone without degassing, dropping, or otherwise bothering the dough was nerve-wracking.

This Week’s Lessons

  • Trust the windowpane test — I’ve never been good about kneading until my dough passes the windowpane test for extensibility. I got it almost there this time, but next time I’ll try to not let my impatience get the better of me. This gets back to my note on bread being a science — getting the gluten to the correct level of stretchiness is what gives a baguette its deliciously crusty exterior.
  • Score aggressively — As I mentioned, my scoring work was hasty and sub-par. Next time I’m going to be less timid about it — those slashes are functional, after all, and not just cool-looking.
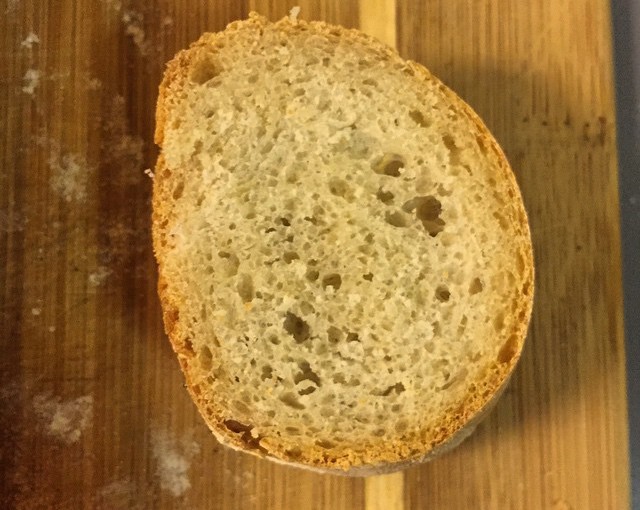
  • Let it rise — The consistency of my baguette was good, but not great. I wish the crumb had been a little more open and holey, as you find with professionally baked French bread. I think if I had been a little more careful about not bothering it while it was rising or rushed through the process of getting the dough into the oven, then I probably could have gotten the consistency I was aiming for.
  • Eat your mistakes — They’ll probably be pretty tasty all the same!

New Year’s Food Resolutions

pumpravA lot of New Year’s resolutions revolve around food. People try to eat less, or eat healthier. They try to diversify their palate, and maybe try new restaurants or cuisines. My own resolution this year? I’m going to start taking food more seriously.

I’ve been cooking and baking a lot over the last few years, especially since I moved to San Francisco. People love food here. SF has an amazing spread of restaurants to try. Within and without the tech scene, there’s a DIY culture that encourages people to try their hand at new things that often includes everything from pickling parties to noodle-pulling classes. We’ve got world-class farmers’ markets [in]famous for their exquisite but pricey produce and access to fantastic local fish, meat and poultry providers. But while there’s no lack of foodies and hot spots to eat in the city, sometimes it feels like there’s something lacking– people don’t bring their epicurean interests home with them use what they’ve experienced at restaurants and learned in classes on a daily basis. For a lot of my foodie friends, the love stops short of their own kitchens.

marlabagelI’m making it my goal to up my game in a few different ways — I’ll be focusing on improving cooking techniques, experimenting with my own recipes and new combos, and exploring culinary culture in the Bay Area. I want thinking about food to be a meaningful part of my daily life, and I’d love to share what I learn with others. I’ll be posting a mix of recipes, ideas and reviews each week. Stay tuned for more food adventures in 2015!

Roasted Butternut Squash and Caramelized Onion Soup

butternut squash soup cup
I’ve been on a slow cooking kick lately – since I’ve got more time at home to cook now, I worry a bit less about the time needed to properly make the recipes and techniques I want to try. Caramelized shallots with hand-cut ravioli? Sure! Slow-roasted pork shoulder? Why not. This morning, to use up a couple things floating around the kitchen before I head home for Thanksgiving, I tried a slowed-down take on one of my favorites, butternut squash soup.

Note: This recipe takes a while! Between roasting the squash and caramelizing the onions and waiting for things too cool, you’re better off saving this one for the weekend or day when you’re working from home, rather than trying to jam through it at 5pm.OLYMPUS DIGITAL CAMERA

Roasted Butternut Squash and Caramelized Onion Soup

Adapted from Smitten Kitchen’s Winter Squash Soup

Ingredients

  • 1 butternut squash (mine weighed about 2 pounds)
  • 1/4 cup (half a stick) unsalted butter
  • 1 medium yellow onion
  • 3-4 cloves of garlic
  • Sherry or white wine for deglazing (a few tablespoons at most)
  • 4 cups chicken broth
  • 1/2 tsp dried thyme
  • 1 1/2 tsp fresh sage
  • 1 tsp ground cumin
  • 1/2 tsp ground ginger
  • 2 tbsp heavy cream (optional)

Making the Soup

  1. Preheat the oven to 400°F. While preheating, slice the squash in half lengthwise (from stem to butt) and rub the cut sides with olive oil. Place facing down on a foil-lined cookie sheet, and poke the skin side a few times with a fork to help release steam. When oven is ready, stick the cookie sheet on the middle rack and roast until soft (as with boiled potatoes, a fork should slide in without much resistance). It took mine about 30 minutes.
  2. While the squash is roasting, start your onions! Chop up the onion – the pieces don’t have to be too small or too perfect, because they’re going in a blender down the line, but aim to keep them roughly uniform. Add the butter to a medium-sized pot over medium heat, and once it’s melted then add the onions and turn down to medium low. Give it a stir then set a timer for 30 minutes. It’ll sizzle a bit, but the onions shouldn’t brown quickly at all — if they do, turn the heat down a bit but try to keep it at a nice steady burn. Every ten minutes or so (a little more frequently won’t hurt), give them a quick stir. They’ll start to smell amazing after ten or fifteen minutes, but don’t be tempted to stop them early. Caramelizing takes patience. Chop up the garlic and herbs while you’re waiting. Hopefully at some point in the onion caramelizing process, your squash has finished roasting. Take it out of the oven and flip them over to cool. Simmering stage
  3. At the 30 minute mark, add the chopped garlic to your onions and stir them around. The onions should be pretty brown and very fragrant now, and you’ll probably notice brown stuff getting stuck to the bottom of the pot. After about 7-8 minutes, throw a little bit of sherry or white wine into the pot and give it a stir — all the cooked-on stuff should dissolve and add another layer of deliciousness to your soup.
  4. Scoop the seeds out of the cooled squash and discard, then scoop the flesh of the squash into the pot. Add broth, herbs and spices. Bring everything to a boil, then turn the heat down and cover. Simmer for 20 minutes, then turn off. If you’re using an immersion blender you can go right on with the next step, but if you’re using a regular blender, let the soup cool for 10-15 minutes before you try to handle it.
  5. Working in batches, puree the soup to a smooth consistency and return to the pot. You might need to employ the use of an extra pot or bowl to keep your blended and unblended soup batches separate.
  6. If you’re adding heavy cream, add it now and give it a stir to incorporate. Then do a taste test and add salt to taste. You might also want to add additional seasonings like more cumin, pepper or paprika, depending on what you’re in the mood for. Serve immediately with toast, grilled cheese sandwiches or croutons, or cool down and freeze for a rainy day.

OLYMPUS DIGITAL CAMERA

Mushroom Pasta Carbonara

Confession time: I’ve got my flashy arsenal of “cooking for people” dishes that I whip out whenever I have an audience, which I define as me + anyone who’s not me. The things I generally make when I’m on my own? Whole different menu. This version of pasta carbonara is one of my favorite meals for one– a cleaned-up version of a comfort food classic.

OLYMPUS DIGITAL CAMERA

Traditional carbonara sauce is a carefully orchestrated concoction of pancetta (or bacon), egg, cheese, and pepper. My version subs shiitake mushrooms for bacon to retain some of the “meaty” texture of the original sauce. To play up the earthy flavor of the mushrooms, I like to swap out the white wine for rice wine. When we first moved to San Francisco there was a Filipino grocery store down the street from us and it was the best place to shop ever. Cheap veggies and an impressive array of fresh fish, and all the specialty Asian ingredients. (I miss that place). I killed a bottle of Shaoxing cooking rice wine (the clear kind) in about 2 months by adding it to anything that seemed like it needed its flavor kicked up by a dimension or two. Sadly our convenient market is far away now, and I am lazy. So tonight, we’re sticking with dry white wine. Another option is broth (chicken or vegetable), which I find pretty underwhelming when your other option is wine, but it’s not terrible.

This is not a terribly challenging recipe, but pulling it off well does take a good dose of preparation and careful timing. If using drinkable wine (Chinese cooking wine almost always has salt added, and thus is not something you should pour yourself a glass of), open the bottle before you start cooking. This is important for two reasons, the first being that now you get to drink some while you cook, the second (and probably more important) that you won’t have to worry about a rogue cork acting up when the clock is running out.

Slice mushrooms into thin strips and saute them in some butter. Once they’re soft and brown(er), pull them out and set them aside.

OLYMPUS DIGITAL CAMERA

Mince onions and garlic and prepare to start cooking them. If you don’t know what mince means read this now. Start boiling a pot of salted water now. This is important for the whole timing thing.

Throw garlic and onions them in the pan with more butter. Take note that this is a vegetarian recipe, but by no means vegan and by especially no means skimpy on the butter. Cook your onions/butter until onions are soft and translucent and garlic is fragrant. If you’re using rice wine, go easier on the salt than you think you should. For white wine, salt normally.

OLYMPUS DIGITAL CAMERA

Now add rice wine/white wine/broth to the  onions and turn down to a nice simmer. You want to the liquid to reduce a bit, but not let it entirely disappear.  Check your water. Is it boiling? If it is, add your pasta.

While the pasta’s cooking crack your egg(s) and beat them a bit, then add parmesan and parsley and and mix it all up. Take onion mixture off heat and add mushrooms.

OLYMPUS DIGITAL CAMERA

Now for the tricky part. When the pasta’s done, give it a quick drain but don’t rinse it; you want to retain as much heat as possible. Throw it back in the pan and pour the egg mixture over the pasta and stir until pasta is coated. Now add the onion/mushroom mix and stir to incorporate.

OLYMPUS DIGITAL CAMERA

The residual heat from the hot pasta should be enough to cook the egg, but if it doesn’t seem done enough (or if you’re paranoid about raw egg), you can turn the pan on low for a minute or two. Make sure that if you do this, the egg mix has adequately coated the pasta or else you’re get a weird, scrambled egg-like curds instead of a nice creamy sauce. See? That wasn’t so hard.

Mushroom Carbonara For One 

Ingredients

Butter for cooking (a few tablespoons)
1/4 lb pasta of your choice (something with a lot of exposed surface area is best, e.g. linguine, spaghetti or fusili- stay away from anything with holes in it, such as elbow macaroni or penne)
2-3 ounces shiitake mushrooms
1/4 of a large white or yellow onion
3 cloves of garlic
1/2 cup white wine or rice wine (can substitute 1/4 broth, see below)
1/4 cup vegetable or chicken broth (can substitute another 1/4 cup of whatever wine you’re using if you don’t have it)
1 egg
1/2 c grated parmesan cheese (plus more for topping)
a small fistful of fresh parsley, minced (plus more for garnish)
black pepper (freshly cracked is obviously the best choice, but I don’t have a pepper mill, which tells you how much I care about particular spice at this point in my life)

Directions

1.  Prep: Open wine, fill large pot with water, clean & assemble ingredients.

2. Heat a pan over medium heat with some butter. While it’s heating, slice mushrooms lengthwise, then add to pan. Cook until soft and brown, then remove from pan and set aside.

3. Start boiling pot of water. Mince garlic and onions and add to the same pan you used for the mushrooms (with more butter, of course). Add salt and cook over medium heat until onions are translucent and garlic is fragrant.

4. Remove onions and garlic from pan and deglaze with 1/4 cup wine. When wine is simmering add mushrooms, onion mixture and the other 1/4 of liquid to the pan. Turn heat to low and let simmer.

5. Add pasta to boiling water and set timer. While pasta is boiling, beat together egg, cheese and parsley until well incorporated.

6. When pasta is done drain quickly then return to pot. Immediately pour egg mixture over pasta and turn to incorporate. When pasta is coated, add mushroom mixture. If the consistency seems too runny, set the heat back on low for a minute or two to help “cook” the egg mixture. If you do this, stir continuously!

7. Serve with black pepper and a bit more cheese, if you like.

OLYMPUS DIGITAL CAMERA

Peanut Butter Brownies

It’s Saturday night in San Francisco, and while some of our friends are out pregaming before a Gold Room concert, I’m at home playing a board game. What I lack for competitive spirit on game nights I make up for in baked goods provided over the course of the evening. Sometimes I even score a come-from-behind victory by plotting my win while baking cookies. Shhh.

Tonight I’m pairing settlers of Catan with an improvised recipe for peanut butter brownies. I have yet to hear any complaints.

OLYMPUS DIGITAL CAMERA

I’ve been looking for a low-fuss peanut butter brownie recipe but none of the ones I’ve seen lately look quite right. So I pulled a basic brownie recipe from smitten kitchen and an old stuffed peanut butter cookie filling  recipe that I’ve had for a while (gotta make those again sometime).

Brownie Batter

I never have any baking chocolate on-hand. I always have cocoa powder. You can easily sub cocoa powder for baking chocolate by combining 3 tbsp cocoa powder and 1 tbsp oil (vegetable or an otherwise neutral oil) for every 1 oz of baking chocolate called for. Easy peasy. Take a moment to admire the cool-ass beads of chocolate oil that form on your cocoa mountain.

OLYMPUS DIGITAL CAMERA

This is a pretty straightforward one bowl recipe; just go down the list mixing in 1 ingredient after the next and stirring until just combined each time.

brownie-mix

For the flour I switched from whisk to spatula and folded it in gently (although brownie batter is pretty tough, so it doesn’t have to be handled as delicately as, say, biscuit dough). Pour it into a buttered pan and set aside. Side note: it’s going to be pretty thick, so it might not spread super easily.

Peanut Butter Topping

You know what sucks? Separated peanut butter. You know what sucks more? Costco-sized jars of separated peanut butter because oh my GOD you cannot recombine that stuff without getting awful peanut oil all over the sizes of the jar. Ugh. Now that we’ve dealt with that, the peanut butter topping is pretty simple. Mix up powdered sugar, butter, peanut butter and vanilla. Done.

OLYMPUS DIGITAL CAMERA

Layering your peanut butter and brownie mix isn’t rocket science. The only thing you need to remember is not to overmix, which would result in a bit too much homogeneity in your brownie treat. Just run a fork through your batter like you’re the hero in a Tolstoy novel,  plowing furrows in the hard Russian earth as you contemplate your own flawed human existence. Or whatever. Make patterns.

OLYMPUS DIGITAL CAMERA

They’ll make a bit more slowly than regular brownies, since they’re insulated under a nice peanut buttery blanket of goodness. These were in the oven for about 35 minutes, then they rested for about 10 minutes before I cut them.

Pro-tip for all: a humble plastic knife is the very best tool for cutting brownies cleanly. I didn’t use one today, but my friend Christina swears by it. She really should start a lifehacking blog, but she’s too busy in med school. You know, becoming a truly productive member of society instead of just an expert brownie hacker.

Check out these wayyy expert stab marks where I tested for doneness! It was my turn, I had to go roll the dice.

OLYMPUS DIGITAL CAMERA

Peanut Butter Brownie Recipe

Brownie base adapted from smitten kitchen’s favorite brownies

Brownie Batter
tbsp cocoa powder + 3 tbsp cocoa powder
1 stick (4 ounces or 115 grams) unsalted butter, plus extra for pan
1 1/3 cups (265 grams) granulated sugar
2 large eggs
1 teaspoon (5 ml) vanilla extract
1/4 teaspoon table salt (about 2 grams)
2/3 cup (85 grams) all-purpose flour

Peanut Butter Topping
2 tbsp butter, melted
1/3 cup powdered sugar
1/2 cup peanut butter (smooth is better, but chunky is ok)
1 tsp vanilla extract

1. Preheat oven to 350F and butter an 8×8 pan.
2. Mix cocoa powder, oil and butter in a large bowl. Add remaining brownie batter ingredients in succession, stirring to combine after each addition. Fold in flour until just combined. Pour into buttered pan.
3. In clean bowl, stir peanut butter mixture until blended. Spoon/pour over brownie batter.
4. Using a clean butter knife or toothpick, swirl peanut butter mixture until it covers the brownie batter, but not so much that they mix together too much.
5. Bake for 30-35 minutes, checking with toothpick for doneness (will come out clean) starting at 30 minutes. Let cool 10 minutes before munching.

OLYMPUS DIGITAL CAMERA